Testing Solar Panels with a Multimeter: A Beginner's Guide
Harnessing the sun's energy through solar panels is a game-changer for renewable energy. But like any technology, they require occasional testing to ensure they're performing optimally. For those new to solar technology, a multimeter—an accessible and versatile tool—can become your best friend in monitoring the health and output of your solar panels. Let's break down how testing solar panel with multimeter can demystify the process and give you the confidence to keep your solar system in top shape.
Understanding Multimeters
First off, a multimeter measures electrical properties such as voltage, current, and resistance. For solar panels, we're primarily concerned with voltage and current, as these will tell us about the panel's output and health.
Safety First
Before diving in, safety is paramount. Ensure the solar panel is in a safe, stable position, and you're equipped with any necessary protective gear. Remember, even on cloudy days, solar panels can produce significant voltage.
Setting Up Your Multimeter
- Select the Right Setting: Set your multimeter to measure DC voltage for most solar panel tests. If you're checking the panel's current output, switch it to the DC current setting.
- Connect the Probes: Attach the multimeter's red probe to the panel's positive terminal and the black probe to the negative terminal. This setup is for checking voltage. For current, you'll need to connect your multimeter in series with the solar panel and the load, which is a more advanced measurement.
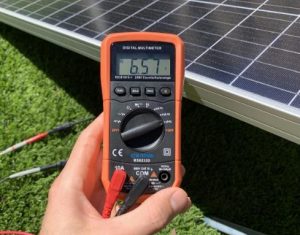
Measuring Voltage
To test a panel's voltage:
- Position the Panel: Ensure the solar panel faces direct sunlight for the most accurate reading.
- Connect and Read: With the probes connected to the respective terminals, read the multimeter. A healthy panel should show a voltage close to or above its rated open-circuit voltage (Voc). The Voc can typically range from 20V to 40V for residential panels, but always check the manufacturer's specifications for precise figures.
Measuring Current
Testing the current, or short-circuit current (Isc), requires a bit more setup:
- Safety Check: Make sure the solar panel is disconnected from any system or load.
- Connect in Series: Unlike voltage testing, for current, you'll need to have the multimeter connected in a way that the current flows through it. This usually means disconnecting the panel from the circuit and using the multimeter to complete the circuit.
- Direct Sunlight: As with voltage testing, ensure the panel is in full sunlight.
- Read the Measurement: The reading should be close to the panel's rated Isc, which varies but can be around 5A to 10A for many panels.
Testing solar panel with multimeter not only gives you insights into your solar panel's performance but also helps in troubleshooting issues like underperformance or potential damage. It's a critical skill for anyone looking to maintain a solar power system, ensuring that the clean, green energy keeps flowing efficiently.
Key Takeaways
- Always prioritize safety by wearing protective equipment and ensuring the panel is stable.
- Use a multimeter to check both voltage and current to get a comprehensive understanding of your solar panel's performance.
- Compare your readings against the manufacturer's specifications to assess panel health.
Mastering the use of a multimeter for solar panel testing empowers you to keep your renewable energy source in peak condition, maximizing efficiency and extending the lifespan of your solar investment.